
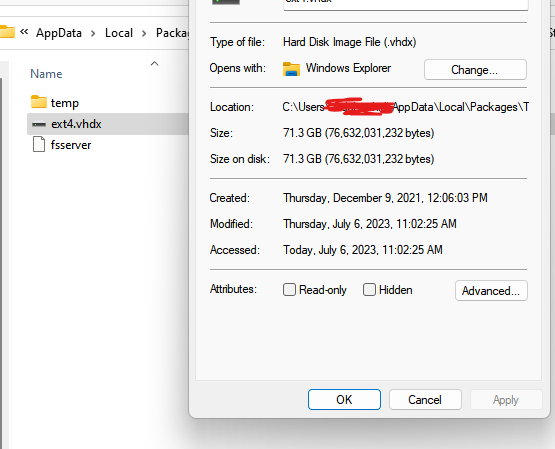
I was struggling to compact my WSL VHDX disk, it has hardly 10 GB data but it was showing 72 GB in size.
I used following method one which gave 1 GB benefit. But method 2 saved 50GB+ space. (Last screenshot in this article)
Method 1: (Not working)
In command Prompt
diskpart
DISKPART> select vdisk
file="C:\Users\yourusername\AppData\Local\Packages\WhitewaterFoundryLtd.Co.16571368D6CFF_kd...\LocalState\ext4.vhdx"
DISKPART> compact vdisk
Same instructions available here
Method 2: Using WSLCOMPACT
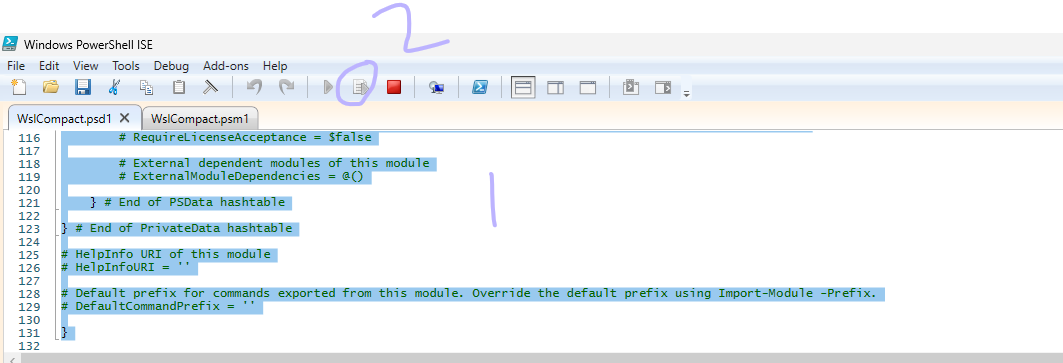
Open Powershell ISE

Download the github repo https://github.com/okibcn/wslcompact

Open the files inside WslCompact folder in powershell

Select all the code in this file WslCompact.psd1 and click RUN SELECTION (as shown in below image)
This would allow you to run the wslcompact method.
Then you need to set a temp path, i used my D Drive.
$env:TEMP="D:\tmp_c"
Then run the following
WslCompact -c Ubuntu
Depends on your linux distro

You may see an error like below if wsl is still not shutdown properly.
If the operation is successful you would see

New Image compacted from 73082 MB to 22884 MB
Do you want to apply changes and use the new image (y/N): y
Image replaced for distro: Debian

Done.
Tags:
WSL2 Windows
ağrı
ReplyDeletevan
elazığ
adıyaman
bingöl
54FN
6B236
ReplyDeleteArdahan Parça Eşya Taşıma
Sakarya Evden Eve Nakliyat
Aydın Evden Eve Nakliyat
Karaman Evden Eve Nakliyat
Giresun Lojistik
10768
ReplyDeleteÇanakkale Parça Eşya Taşıma
Burdur Lojistik
Samsun Evden Eve Nakliyat
Bartın Evden Eve Nakliyat
İzmir Lojistik
9AAE4
ReplyDeleteAnkara Evden Eve Nakliyat
Sivas Lojistik
Düzce Parça Eşya Taşıma
Batman Evden Eve Nakliyat
Antalya Parça Eşya Taşıma
0FA03
ReplyDeleteKastamonu Parça Eşya Taşıma
Ağrı Parça Eşya Taşıma
Bartın Parça Eşya Taşıma
Burdur Parça Eşya Taşıma
Afyon Parça Eşya Taşıma
D2F6E
ReplyDeleteBitranium Coin Hangi Borsada
Hakkari Lojistik
Bingöl Evden Eve Nakliyat
Batman Şehir İçi Nakliyat
Sinop Şehirler Arası Nakliyat
Dxy Coin Hangi Borsada
Kırklareli Şehirler Arası Nakliyat
Antep Lojistik
Floki Coin Hangi Borsada
B1622
ReplyDeletebinance indirim kodu %20
C03C5
ReplyDeletekarabük kadınlarla ücretsiz sohbet
chat sohbet
sohbet muhabbet
afyon canlı sohbet siteleri ücretsiz
kırıkkale rastgele canlı sohbet
ankara bedava sohbet chat odaları
eskişehir sesli sohbet siteler
kilis bedava sohbet chat odaları
muş parasız görüntülü sohbet
78D7A
ReplyDeletetelefonda rastgele sohbet
adıyaman canlı görüntülü sohbet uygulamaları
erzincan yabancı görüntülü sohbet siteleri
antalya telefonda kızlarla sohbet
afyon canlı görüntülü sohbet siteleri
mobil sesli sohbet
kayseri mobil sohbet bedava
manisa canlı sohbet uygulamaları
konya görüntülü sohbet canlı
BF698
ReplyDeletelooksrare
metamask
ledger live
quickswap
dexscreener
trezor suite
shiba
pancakeswap
trust wallet
88B54
ReplyDeletedebank
shapeshift
uniswap
pinksale
uwulend finance
poocoin
thorchain
bscpad
spookyswap